This is just a simple, introductory example intended for first time users of PC Guard DEMO version.
There are so many different protection strategies you can easily implement with PC Guard software protection system. This is just a matter of setting appropriate options in project settings and clicking on Protect button!
We'll be using default, remote protection method in this example.
Stage 1: Protection
Let's say we want to protect our test application (test.exe) which is located in "c:\test" directory.
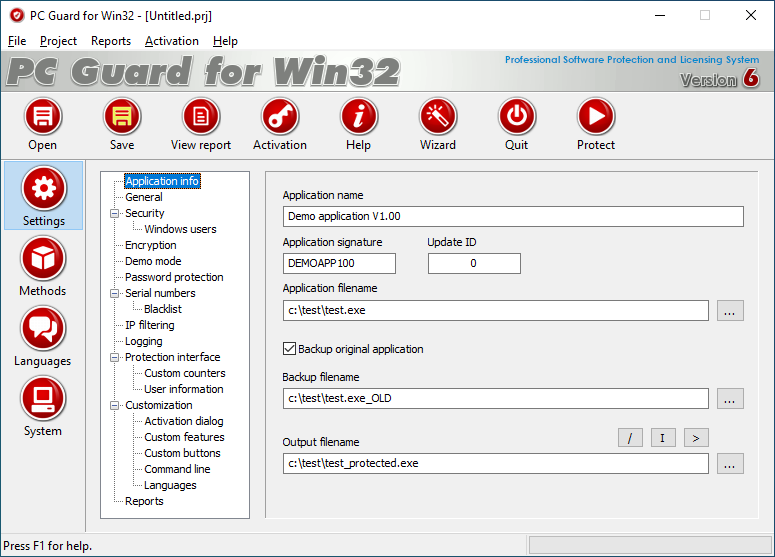
Application info settings are opened by default. These are basic settings about application we are going to protect.

Application name value is predefined in demo version and is set to "Demo application V1.00". You can change it now to your application name.
Same goes for Application signature value. It is already set to "DEMOAPP100". You can change it to any value you choose or leave it like this for this example.
This is the full path to application we are going to protect. In our example this field should be set to "c:\test\test.exe". You can also set this value by using browse ('...') button.
This is the full path to resulting, protected application. In our example this is "c:\test\test-protected.exe".
If this field is left empty, PC Guard will apply protection directly to source application defined in Application filename field.
Ok, enough of setting options for now. Let's do some protection!
Congratulations!
You have just protected your application with remote protection for the first time!
At this point, PC Guard have created new, protected copy "c:\test\test-protected.exe" from original application "c:\test\test.exe".
If you look at protected copy in Windows explorer and compare it to original application you will notice that the size of protected application is higher than the size of original application. This is because additional protection code has been embedded into your application during protection process. This protection code will handle all licensing tasks for you!
Protected application is at this point in locked state and will require activation on each computer where it is installed and run. Application can not be run without valid activation code. Each computer will require different activation code.
Let's activate our test application on our computer...
Stage 2: Activation
- Copy interface dll (iDLL.DLL) to output directory. You can do this manually or just click on 'I' button (located above output application field).
- Minimize PC Guard's window.
- Run protected application from Windows Explorer or by clicking on '>' button right above output application field.
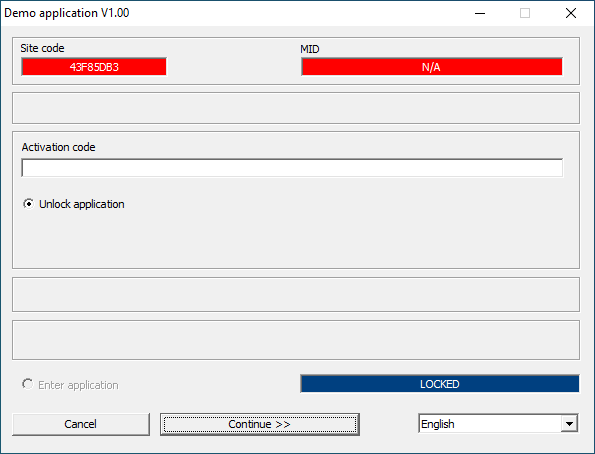
- Activation dialog box with Site code will show up:

- Mark Site code (in above case 43F85DB3) and copy it (press Ctrl-c).
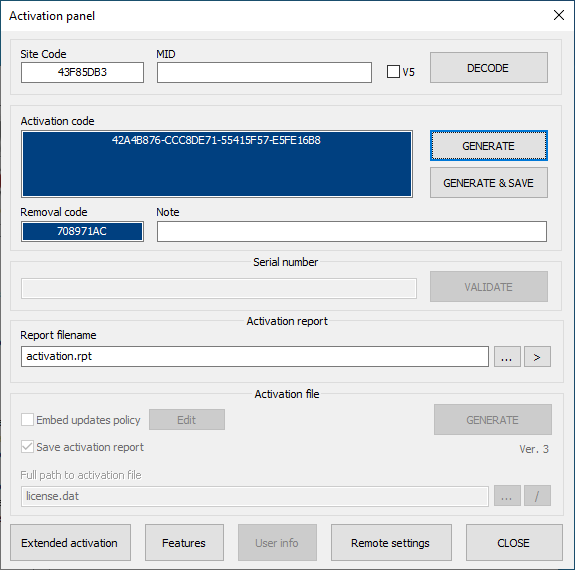
- Switch to PC Guard and press "Activation" button on main toolbar to open Activation panel.

- Paste (press ctrl-v) Site code into appropriate field.
- Click on 'GENERATE' button to generate valid activation code.
- Mark and copy generated activation code.
- Switch back to activation dialog box.

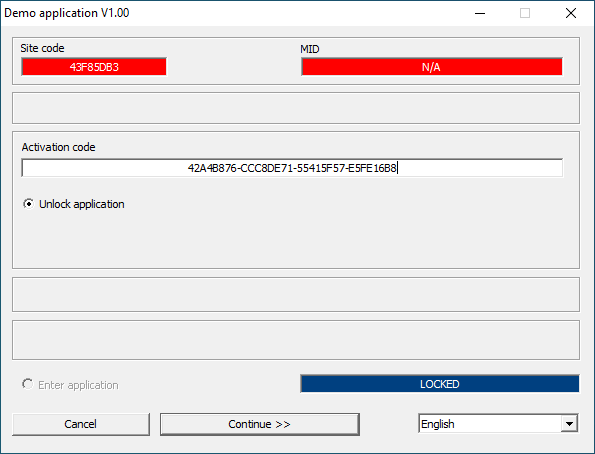
- Paste activation code into appropriate field:
- Press "Continue >>" button to activate protected application.
That's it! Protected application will start at this point.
NOTES:
- Program protected with demo version of PC Guard can be run 20 times only. It will also display a warning message and quit on random occasions. Once it is run for 20 times "No more executions left!" message will be displayed on each run.
- Change Application signature value and protect your program again in order to get additional 20 runs.